Monday, February 20, 2012

Three Way


     Progress begets progress, if physically possible would work on 24/7, hurry, conclude mess; primary Swett Lodge lesson: one step at a time. 
     Lightly nail removal damaged siding to fresh studs east side below middle bedroom window: bit ugly but functional, will rework when painting.  Button up east side exterior.
     Like bath window, all Swett Lodge windows have couple 2x4 horizontal header directly above window, short vertical 2x4s to top plate.  When coupled with 1x6 lap siding this header is almost adequate to bear weight of roof load on east wall for small window; entirely inadequate for larger windows.  Reengineer: chainsaw halve short vertical 2x4s; chainsaw cut header, sill left of vertical 2x4s window left, left of vertical 2x4 window right.  Hammer bust out superfluous framing, end cutter clip protruding nails. 
Circle saw cut double 2x8 header (back porch rail salvage), cut couple support studs proper length, install header tight to upper wall plate atop supporting stud next original full length stud, drive in supporting stud other end of header; nail original full length studs to supporting studs, header either side; makes good sturdy header above original skew mount window.  When time for new windows comes, any size window that fits under this header will work.
     Much larger middle bedroom window receives similar treatment, 4x10 salvage from under house support as header.  Remove short vertical 2x4s above window, clip nails, chainsaw cut full length stud right side window to supporting stud length, fit 4x10 atop supporting stud, 20 ton jack raise other end tight to upper wall plate, install supporting stud, full length stud pair, nail soundly.  Beefy header will eliminate inadequate header/wall sag, allow any size window fits below header replacement.
     Front bedroom east window slightly different treatment: remove short vertical 2x4s above original header, clip nails, chainsaw full length studs either side window to header support length.  Had planned two rough cut 2x12s garage work bench salvage header but realize (unlike reported last time) walls are 3.5 inches thick, won't allow double full two inch thick 2x12 header.  Hugely strong 2x12 eight feet long, fits just right atop support studs either side window, between next stud over both sides window.  Multi nail 5/8x12 plywood strengthener to header, end nail through full length studs either end: could safely drive Mack truck over that window now.
    East front window gets same treatment as bath window: halve short upper 2x4s, hammer whack out, clip nails.  Cut original window adjacent full length studs to supporting stud length, mate full length studs out side, jack raise upper wall plate, 4x4 bludgeon double 2x12 salvage front porch rail header into place one piece at a time, secure nail all.
     Walls properly restructured, go outside, raise temporary eave beam, remove supports: Swett Lodge settles on foundation.  Inside, remove temporary 2x6 supporting wall, toss outside through window, front porch haul 2x6s, firewood circle saw dice - good thing: getting firewood short - stack 4x4s.
Final floor beam adjustment aside (can still see light under east front corner sill plate; east, center beams too high) east side Swett Lodge stands on its own again.
     Generally sheet rock prepare: replace few funky bath wall studs, extend wall for new angled door.
     Mount six outlet boxes on east side studs (not under windows, avoid replacement issues); drill holes through lower wall plate, sub floor into crawl space; another time Swett Lodge under crawl feed wire up through holes start under front window.  Neatly staple wire to joists, crimp wire, feed to boxes six times, then run wire cross house ready to feed into service box, connect later.  Take few screw driver/flashlight moments, scout west side rot: want solution mull time.  No surprises: already expect replace two rotten front joists with three new; only one other joist rotten inside new beam - will marry; bit of rot in joist below kitchen sink needs excising, mate/strengthen that joist; stubs all the way round will do it.  West side shouldn't be any where near as challenging as east side: gettin' there!
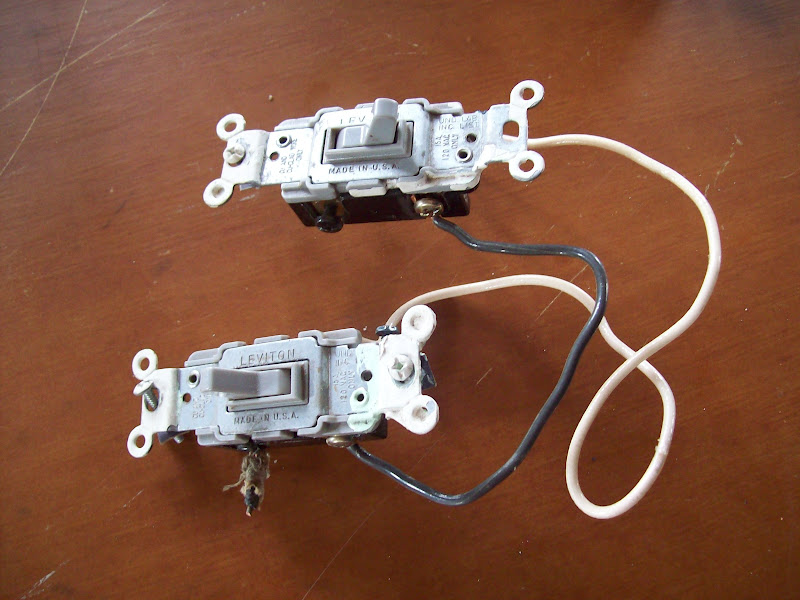
     Swett Lodge opened up requires different light switching; online research; refreshed, find three way switches pretty simple; now memorized, for years didn't get the logic.  Three way switch allows two distinct location lamp control.  Common single pole switch has two connections: one line hot, one lamp hot, allows one location lamp control.  Three way switches have three connections, one designated common.  As pictured, wire two terminals on each switch to analogous connections on other; finally connect lamp hot to one switch's common terminal, line hot to second switch common terminal: simple, but careful - generally do this sort of thing without turning off power.
Want to activate front and middle bedroom ceiling lamps from two locations: front, by front door and east side window (in case door to carport area materializes there); middle, by east side window and bathroom.  Connect two switches as shown, disconnect original switch, trace wires back to lamp, ascertain which is hot.  By front door break through plaster ascertain which wires run where, use 100' foot extension cord as jumper, figure out which wires to cut/redirect/connect.  Attic climb; clip, tape wire where necessary; redirect through drilled upper wall plate holes.
In the old days (Swett Lodge built 1924) wire coverings weren't as durable.  Old fabric covered wire was abrasion susceptible so was ceramic spacered off rough surfaces (wood), ceramic sleeved (thimble) where it passed through holes.
These days wire coverings are pretty tough, so wire can be laid anywhere it won't be subject to external compromising forces - crawl spaces, attics, stud spaces - without extra protection, can pass through holes in wood with no extra protection.  Yellow modern Romex/old wire converge in new three gang box near middle bedroom window.  Three switches will be: middle bedroom ceiling lamp, outside carport lamp, front bedroom ceiling lamp.  Original cloth cover red wire enters switch box through black fabric abrasion resistant original cover, initially thought this treatment would be adequate, will go back black abrasion resistant cover all red wire.  Thread yellow Romex up into attic, over to switches by front door, bath door.  Amend original lamp wires: securely twist bared wire ends together, electric tape well, black abrasion resistant cloth cover, thread to switch box.
Run wire up through hole in siding for external carport/'lumberyard' lamp.  Realize an outlet would be nice out there, will add insulate/sheet rock prior.
     East side wiring squared away, quickly fit few pieces wood, fill flooring voids where bedroom walls/closets used to be;
haul styrofoam into attic, home owner comfort sight: 12 inches free foam insulation (actually donated tile shipping protection) cover 80 square feet or so of ceiling.  2x4 ceiling rafters totally inadequately strong especially on east side where room walls allowed inferior material use, thankfully support my weight while working, will require reengineering along with overloaded roof rafters into a quasi truss like system that will flatten/support roof and ceiling.
Top closet/bedroom wall plates tied into perpendicular walls, chainsaw sever,
remove, denail, 'lumberyard' consign.
All wall plates removed, staunch constant mica insulation down pour:
nail lath over voids, go into attic plastic cover lath - dusty old mica insulation stays there now, where it can do some good.
Knock cement ridges along wall plates off ceiling, collect, haul behind garage; scrape together sifted down mica insulation piles, fill dust pan, attic reinsert; wood scraps to stove; sweep; vacuum: insulation, sheet rock ready.  From front window,
throne.
Perhaps you can tell: completion antsy.  Going to be nice space, get's better by large increments now: come on!  Spend good Sunday chunk pull down, denail wall plates while LA friend McDougal forbears on speakerphone; run outlet wires; clean; about dark beer pause.  Still energized, rally Gertie - here curbside Swett Lodge front await off load - make under cover of dark HD run.
Those concerned 'bout stagnate economy will be glad to know Swett Lodge infuses major cash: $250 insulation, sheet rock load brings Swett Lodge expenditures into $1500 realm.  Who says we aren't having fun yet?
     Artistry scarcity clue to impatience experienced here: just don't take time.  Argue many Swett Lodge efforts require artistry degree unfamiliar to most, unrecognizable due to location/function: after all art is in the eye of the beholder.  Second daughter visit two weeks hence emphasizes completion sentiment: expect insulation, sheet rock install this week followed by general daughter visit prep week mixed with few outside chores.  Of course it'll appear here.
     Be well.  Peace.
Monday, February 13, 2012

Miasma


     Swett Lodge prayer wheel spins thankful: palpable progress, near future work above deck.  But more things change, more things same - in Thai 'same, same, different'.  Neighbor says she can't see any Swett Lodge change.  Must be language barrier - she's from Latvia, speaks excellent English - like most, she speaketh not Building.  External visible change at Swett Lodge will be some time coming: structure first, dedumpify Swett Lodge living quarters next, then perhaps something outside....
     Believe development arrested at 'scarf joint '.  Below: 7/8"x9"x4' plywood 45 degree angle scarf joint, abundantly nail existing 2x8 joist.  Theory: scarf joint ply more fully strengthens/stiffens 2x8 joist (which carries 2x6 stub joists) than butt joint ply.  (Ply strengthener my short cut: doubling 2x8 joist carrying stubs like this while overkill, current practice.)  At left note perpendicular score, x left: next stub location.  Sawn original sub floor boards above ply, 1x3 gap fill board lays on stub joist.  Atop stub note previously installed one inch ply sub floor: slightly jack raise; slip in (OK: lay on back; use hands/feet; rejack; try again, again,...) next 2'x4' one inch ply sub floor piece, butt joint atop stub. 
Move jack under new ply piece, raise into place, nail in remaining stubs 'til west side rework.  Reenclosed crawl space sepulchral incandescent.
Gertie haul home sixteen foot 2x6 front east perimeter joist - makes east side new lumber total $90 - slip into place, you know: hammer bang, bang; 4x4 bludgeon; jack assist slip into place.  Edge nail sawn treated sill/perimeter joist; triple sixteen penny end nail stub joists through perimeter joist - oops!, didn't lower jack prior, allow weight compress everything: release jack pressure, wonder bar denail stub joists (dozen well sunk sixteen pennies altogether); appropriate compressed position renail.  Completes east side Swett Lodge under structure work. 
Upstairs inside; fit, nail one inch ply east front corner piece, slotted true 1x6 cedar deck board gap fill.
Poke through 'lumberyard' supplies, finally premonition agree: 3/4 inch ply doors from Kate's lake place adequately fill front room sub floor vacancies.  Creative fitting/sizing just eliminate door's rot, slip under jack raised finish floor ample, require couple additional under floor 2x4 supports.
Reengineered front room floor allows 3/4 ply; add quarter inch ply match original one inch rough cut sub floor board thickness, sneak (sneak: more cajole than slip) under jack raised finish floor.
Middle room original two foot joist spacing requires minimum one inch board sub floor: salvage one inch board, true 1x6 cedar deck board, puzzle piece.  Remove closet/front room studs, finish floor boards, reveal ancient original rough cut 1x10 sub floor, extent replaced sub floor under finish floor (right, salvage finish floor boards photo top center).
Piece remainder middle room sub floor around salvage 1x10 placed along edge for strength, few finish floor boards still attached to short section good original sub floor board.
Further rummage 'lumberyard', locate 3/4 ply, piece bath sub floor, final nail except under stool.
Confident ample sub floor replacements available in Swett Lodge salvage 'lumberyard', find uncanny: use practically every piece available, fill voids remarkably well.  Even require square kitchen table ply, aesthetic round replace.  Awful lot of folk crazy 'bout screws as fastener choice these days: still prefer nails.  Easy install, hugely strong, relatively easy removal.  Here, toenail table top to stud atop coat rack/stringer; nail support under top into stud at left, toenail through top to stud; couple nail top into 2x8 single leg; voila: table, easy remove when time comes, sturdy as hell.
     Jack handy, raise ceiling/wall from floor, start front east corner persuade Swett Lodge salvage 2x4 lower wall sill plate under studs.
Stretch string, level verify wall alignment, lay in front room lower wall sill plate.  Reuse salvage materials eliminates resizing hassle when use new lumber: original Swett Lodge 2x4s measure 1-5/8 inch x 4 inch; new 2x4s measure 1-1/2 inch x 3-1/2 inch - pull few nails any day of the week.
Continue lower wall sill plate through middle bedroom;
finish out bath lower wall sill plate
where it's necessary to shim 3/4 ply bath sub floor to one inch using 1/4x4 strips; 20 ton jack persuade corner into position, garage wall as base.
     String/level align wall requires front corner half inch inset from foundation,
slight over hang mid wall; no worries: 
sheet metal or plastic skirt below siding will cover perimeter joist; include screened, louvered vent covers.  East side completely perimeter joist enclosed could barely sleep at night knowing miasmatic still moist air envelops Swett Lodge underpinnings; solution: chain saw regular vents into perimeter joist.  Venting Swett Lodge here and in attic probably simplest, quickest yet most longevity effective of any Swett Lodge task: cool, moisture unencumbered air promotes preservation.
     Front room/closet walls partially removed; go ahead, deconstruct, denail for future use 2x4 walls.  Begin to get an idea of what a nice sized living space Swett Lodge will be all opened up.  
Alchemy continues, hints past master connection: reduce ancient rot ridden scrap; conjure; Swett Lodge phoenix arises.  Difficult articulate already obvious huge difference Swett Lodge renovation incurs; new life spurs steady progress; transformation catalyst thrill.  Claw foot anyone?  Archimedes?
Prayer wheel spins on: 
thanks.
Peace 

Monday, February 6, 2012

Toot


     Under appreciated Swett Lodge under belly restructure continues daily focus.  Back to nearly daily exercise - alternate day schedule, body too cranky - add daily guitar play; get up bit earlier, streamline morning chores: work time remains about same.  Results feed complete work appetite, drive contractor. 
     Begin box store lumber yard purchases, am reminded lumber selection - like any purchase - personal choice.  Rarely take pot luck from any purveyor; take time, sort through fair stacks treated/non lumber find straight grain, not too knotty, straight boards no wane - raw log edge - hey, lumber costs good money.  Indeed, selecting appropriate lumber from Swett lodge 'lumberyard' also time consuming: optimize resources.  Insulation, sheet rock ready will talk to box store about home delivery, for now manage Gertie haul home occasional necessary board/joist.
     Position sill sealer, treated 2x6 sill plates prior, broom foundation top, hammer chisel lumps/high spots smooth - original construction had no sill, poured foundation top left raw.  Have salvage squirrely treated 2x8x10 on hand, figure use for front east sill plate: board bow matches foundation top bow, circle saw rip 2x8 attain edge as straight as foundation.

Sneak 2x8x10 under leaky old spigot (note lighter saw cut edge);
just reaches porch, old rotten perimeter joist peeking from underneath.
Lay in front east side sill sealer, 2x6x8 treated sill plate, 2x6x16 perimeter joist: pry sill up tight to perimeter joist, nail together through underneath edge sill plate, nail perimeter joist to stubs; add stubs where necessary, nail.
     Chain saw dice two original rotten east front side joists, lay on back, judo kick loose, remove.  Cut/remove all nails protruding below floor.  Jack/4x4 raise floor, relocate three previous owner installed unnailed 2x8s from 24 inch centers to sixteen inch centers to strengthen floor, allow use of 3/4 inch plywood sub floor rather than one inch boards.   
     Time remove rotten sub floor boards under east front wall/floor; chain saw balky.  Essential tool: take time, putz.  Find makeshift foam air filter saw dust plugged; remove; clean rag piece replace.  Clean carb, adjust: runs OK now.  Again, crawl under Swett Lodge perform sleight of hand: carefully saw under side rough cut sub floorboards - repeat saw strokes, slowly remove material - remove one ten inch rotten ended sub floor board at a time;
work all way to center beam (rotten joist remainders to be removed with west side rework just visible; lower 2x4 wall plate runs left of blond finish floor underside).  East side rot extirpated.
     Enjoy doing things, making things right; still glad under Swett Lodge east side crawl ending.  Next few weeks above floor - repair wall system, wire, insulate, sheet rock - work: whole bunch easier than under house crawl; work; need something; crawl out; attain; crawl back in; drag tools, jack, materials along; work; saw; breath dust, noxious gas fumes; repeat ad nauseatum.  Ready.  Generally not self horn tooter: realistically doesn't hurt to point out probably half or less folk my age could actually get down on their knees, squeeze through 18 by 22 inch opening, crawl round for hours (don't forget dampness, cob webs).  Current physical condition allows taking/working contortionist positions.  Throw in lifetime learning/understanding tool manipulation, years working with/around buildings: been tough job but heck of a lot less tough for me than nearly anyone else.
    Rot gone, sill plates in; go inside finish east side stub joists.  Similar to bath floor treatment,
notch two 2x8 joists where they extend beyond unremoved flooring (right), support 4x6 (treated: regular slots in wood allow chemical penetration during pressure treating process).  (Little bit notched near 2x8 visible 4x6 left, under 2x6 stub.)  Plan reuse joist hangers attach stubs, ultimately call on Trusty Toenailer; four sixteen penny toenail each stub to 4x6, nail from outside through perimeter joist: gettin' more solid all the time.
Need replace sub floor under east house front before 2x6 stub install.  Slip 2x4 foot full one inch thick (matching original rough cut one inch sub floor lumber dimension) plywood under finish floor, support one end on 4x6.  
Attempt jack/4x4 raise other end from inside foundation to allow 2x6 stubs under sub floor on top of sill plate, find necessary jack one end 4x4 from inside foundation, other end from outside: crawl, haul, in, out, up, down, etc, etc, etc.  Want end nail these stubs through 7/8 x 9 inch plywood pieces then nail plywood to 2x8 joist for added strength, ease of installation: no go.  Nail scarf joint (end 45 degree angle cut cross nine inch dimension) four foot plywood pieces to joist; call on T. Toenailer, 4 sixteen penny toenail stub joists through plywood into 2x8 joist, proper position nail tag to sill plate: plenty strong.  Here stub ends peek out 4x6 left, await purchase/placement 2x6x16 front east perimeter joist.  
Days work done, temporarily replace couple siding pieces, maintain neighborhood decorum.  'Hi' from Swett Lodge.
     Somewhere in the fray, decide plug front outdoor spigot, eliminate hassle working round it when not much used.  Figure store trip in order, purchase plug; realize back faucet leaks not, handle stripped: fine plug (here silhouetted by light through hole in siding spigot used to pass through, small light glimmer above where chain saw accidentally notched siding.  Note bug/rot eaten back side siding - these pieces will be replaced; bottom side one inch plywood sub floor replacement atop 2x6 stub joist.
Turn water off, take both systems apart, put desirable untamperable front faucet (has square handle holder which this combo faucet/church key fits) in back, back faucet as plug.  Cut plastic bag strip - Teflon plumbing tape replacer - thread wrap, duo pipe wrench tighten: ready for action.  
     Awfully nice when work pays off: walking Swett Lodge east side distinctly more solid, less undulating affair; wonderful warm sun fills Swett Lodge front room through reworked front porch peak.  Arduous Swett Lodge under belly work nearly complete for a while, above floor work ought to move along better, be more enjoyable.  Always try take on nastiest work first: longer time enjoy edifying effect done work.
     Work 'bout life's size these days: progress toward completion palpable, increases continue work focus.  Frustrates - would like more round life; at least more easily recognize glimmer as tunnel's end light.  Hope accomplish much over next months, possess enormous ability work concentrate. Perhaps Swett Lodge renovation overwhelmingly strenuous to some, pressure/challenge floats boat.  Remind next time up to armpits in mud, some onerous beam struggling.
    Reports here.
    Peace,
    be well.