Internet access increasingly spotty, intend New Year 3G phone rectify. Limited/nonexistant comment reply apology: dswett@hotmail.com (my email) addressed queries more likely to solicit response. Not largely missing internet access. Have enough material to Swett Lodge work occupy for some time - not necessary to scout Craigslist for more; otherwise email, blog major internet activities. Couple high speed country (Kate's house, library) visits/week manage.
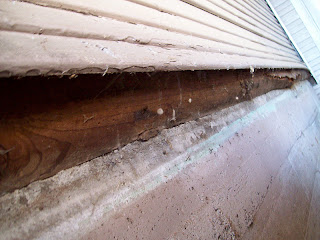
Holidays relax, enjoy. Pleasure in family gather, food, hang out, view NFL, generally notch pace back. Few daylight hours, warm stove/chill days encourage. Family, friends phone visit, catch up; LA buddy wonders what's so exciting about rot? Only say: Swett Lodge floor system repair angle more than year now, make right ready. Not so much 'cited 'bout rot as excited to get rot gone, establish house on permanent, solid foundation. Minor bug infestation evidence exists, suggesting most Swett Lodge floor system rot moisture caused where cement/wood contact. Current building trends dictate wood contacting cement be treated, treated wood sill plate further synthetic foam sill sealer protected. Swett Lodge's original seven inch joist height where joists cross foundation (with out sill plate) will allow 2x6 (actually measures 1.5x5.5 inches) joists mated/stubbed to existing joists as far as newly added beam (~3'), with treated 2x6 laying flat as sill plate. Swett Lodge stays at original height, allowing straight forward front/back porch treatments.
New beam few feet inside east/west Swett Lodge foundation, temporary 2x6 wall couple feet inside east/west Swett Lodge walls, effectively raise Swett Lodge off cement foundation; but rotten joist ends allow exterior wall to slump below floor level by an inch in some areas. Lean 2x4x8 against vertical trim front corner Swett Lodge, rest 2x12x16 atop, lift other 2x12x16 end onto six foot post, then lift under 2x4 eaves from ladder, nail to wall. Back to front corner, raise 2x12x16 tight to eaves, nail to wall. Nail 2x12x16 to wall along its length, try to hit studs.
Attempt repeat good luck on Swett Lodge back end, couple times 2x12x16 (heavy!) tumbles to ground - fortunate no casualties: institute permanent (for this project, 2x12x16 atop here) 'helper',
successfully mount rear 2x12x16, nail to wall along length.
Piece in 2x12 chunk, close gap below rafter; lift center of 2x10x16, struggle up ladder; center nail, evenly lap front/rear 2x12s, nail length of 2x10 to 2x12s mating 2x bottom edges.
Piece 2x10x10 to double back end rafter/wall raise beam, 2x8x8 doubles beam front end (at left), makes 4x8 (minimum) raise exterior wall beam.
Measure requires extra time, brain space: avoid when possible. Number of 4x4s, lots short 2x4s on hand, decide 'adjustable' posts adequate rafter/wall raise beam support. Nail 2x4 (usually) top (usually) cross piece to two post separated 2x4 pieces, slide to proper height (yeah, that's a measurement) nail secure, snug position under jack raised beam.
Figure four posts do the job: if get into it, find otherwise (i.e. not strong enough), adjust. Intuition proves correct - this time.
Need final configuration seven inches, attempt raise eight inches for work room. Start with central post, jack either side, install post, repeat at front corner, get eight inches right away. Back two posts require couple jack 'bites' to get 'em to raise beam/wall sufficiently.
Back corner starts nearly two inches low, reef hard on jack, all sorts cracking, splitting, popping sounds: achieve only 7.5 inches, decide will sufficiently allow 2x6 stub joists, 2x6 sill plate, foam sill sealer.
Light above 2x8 end rafter exhibits ancillary jacking damage: probably broke 2x4 rafter at house corner, beam went on, raised roof boards - all will be righted when new roof goes on.
Carport roof rafter lag bolted to 2x8 end rafter (lower right corner above) helps keep rafter/wall from raising. Remove lag bolt, jack raise carport rafter, post fit, free 2x8 end rafter. (2x4 'adjuster' bottom here.)
Accomplish adequate (7.5 inches plus) stub joist, sill plate, sill sealer, work room entire Swett Lodge east side. Partial reworked bath floor depends on cement foundation one side, raises not: will remove whole section including claw foot tub; rework; add at least one full length joist, 2x6 new joist/rear foundation stubs.
Wall weight off joist ends, floor sag/wall slump allowing rot easily evident.
And looking alongside joist, easy to see it's a straight shot to add stub 2x6 back to blocking above new beam.
So, yeah, 'cited 'bout rot. Drag few lumber items from under house including eight and ten foot 4x12 prophylactic beams previous repairman installed, enable accurate asset assessment; then remove rot, stub joists, install sill plate/sealer. Ready. Pleased: new Swett Lodge under pinning coincides with New Year; couple months worst structural work, history; breath new life into Swett Lodge.
Happy New Year to all who hang with Swett Lodge blog. Writing style difficult enough, technical mumbo jumbo brain numbing - truly expect few understand attempted descriptions; none the less will keep after these posts as personal record; and who knows, maybe someone out there gets a glimpse. Been 'round this block a few times in mind and reality so mentally leap where others might not. Will continue to do best to bring Swett Lodge progress understandably to blog.
Enjoy!


